


服务热线
行业应用

行业应用

基于树莓派RP2040游戏机的简易网络气象站
2022-09-06
172
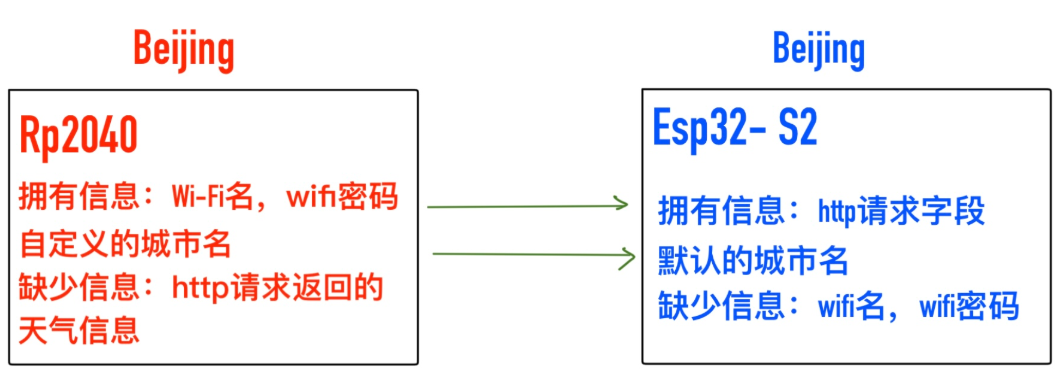
pico esp32s2
tx = Pin(16) --> RXD_PIN (GPIO_NUM_21)
rx = Pin(17) --> RXD_PIN (GPIO_NUM_21)
3V3 --> 3V3
GND --> GND
- http_request/
- CMakeLists.txt
- sdkconfig
- main/ - CMakeLists.txt
- http_main.c esp32主函数,http请求,json解析
- http.h
- uart.c 串口通信部分
- uart.h
- wifi.c wifi连接部分
- wifi.h
# 在此处修改你要连接的wifi名和密码wifi_name = "123"wifi_passwd = "12345678"
/**********wifi初始化函数**************/void wifi_init_sta( char *wifi_ssid , char *wifi_password){
    s_wifi_event_group = xEventGroupCreate();

    // ESP_ERROR_CHECK(esp_netif_init());

    // ESP_ERROR_CHECK(esp_event_loop_create_default());
    esp_netif_create_default_wifi_sta();

    wifi_init_config_t cfg = WIFI_INIT_CONFIG_DEFAULT();
    ESP_ERROR_CHECK(esp_wifi_init(&cfg));

    esp_event_handler_instance_t instance_any_id;
    esp_event_handler_instance_t instance_got_ip;
    ESP_ERROR_CHECK(esp_event_handler_instance_register(WIFI_EVENT,
                                                        ESP_EVENT_ANY_ID,
                                                        &event_handler,
                                                        NULL,
                                                        &instance_any_id));
    ESP_ERROR_CHECK(esp_event_handler_instance_register(IP_EVENT,
                                                        IP_EVENT_STA_GOT_IP,
                                                        &event_handler,
                                                        NULL,
                                                        &instance_got_ip));

    wifi_config_t wifi_config = {
        .sta = {
            // .ssid = wifi_ssid ,
            // .password = wifi_password ,
            /* Setting a password implies station will connect to all security modes including WEP/WPA.
             * However these modes are deprecated and not advisable to be used. Incase your Access point
             * doesn't support WPA2, these mode can be enabled by commenting below line */
	     .threshold.authmode = WIFI_AUTH_WPA2_PSK,
        },
    };


    memcpy(wifi_config.sta.ssid, wifi_ssid, sizeof(wifi_config.sta.ssid));
    memcpy(wifi_config.sta.password, wifi_password, sizeof(wifi_config.sta.password));


    ESP_ERROR_CHECK(esp_wifi_set_mode(WIFI_MODE_STA) );
    ESP_ERROR_CHECK(esp_wifi_set_config(WIFI_IF_STA, &wifi_config) );
    ESP_ERROR_CHECK(esp_wifi_start() );

    ESP_LOGI(TAG, "wifi_init_sta finished.");

    /* Waiting until either the connection is established (WIFI_CONNECTED_BIT) or connection failed for the maximum
     * number of re-tries (WIFI_FAIL_BIT). The bits are set by event_handler() (see above) */
    EventBits_t bits = xEventGroupWaitBits(s_wifi_event_group,
            WIFI_CONNECTED_BIT | WIFI_FAIL_BIT,
            pdFALSE,
            pdFALSE,
            portMAX_DELAY);

    /* xEventGroupWaitBits() returns the bits before the call returned, hence we can test which event actually
     * happened. */
    if (bits & WIFI_CONNECTED_BIT) {
        ESP_LOGI(TAG, "connected to ap SSID:%s password:%s",
                 wifi_ssid, wifi_password);
                  http_get_task();  //连接成功,发送http请求
        // sendData(TAG,"connectsucess");
    } else if (bits & WIFI_FAIL_BIT) {
        ESP_LOGI(TAG, "Failed to connect to SSID:%s, password:%s",
                 wifi_ssid, wifi_password);
        sendData(TAG,"Connectfail");  //连接失败,发送状态告知pico

    } else {
        ESP_LOGE(TAG, "UNEXPECTED EVENT");
        sendData(TAG,"Connectfail"); //连接失败,发送状态告知pico
    }

    /* The event will not be processed after unregister */
    ESP_ERROR_CHECK(esp_event_handler_instance_unregister(IP_EVENT, IP_EVENT_STA_GOT_IP, instance_got_ip));
    ESP_ERROR_CHECK(esp_event_handler_instance_unregister(WIFI_EVENT, ESP_EVENT_ANY_ID, instance_any_id));
    vEventGroupdelete(s_wifi_event_group);}
//HTTP请求函数void http_get(char arg){
    const struct addrinfo hints = {
        .ai_family = AF_INET,
        .ai_socktype = SOCK_STREAM,
    };
    struct addrinfo *res;
    struct in_addr *addr;
    int s, r;

    char recv_buf[64];
    char mid_buf[1400];   //接受http报文正文部分

    memset(mid_buf,0,sizeof(mid_buf));
    char WEB_PATH[200] = "GET " ;

    // 组合字段构成http请求的发送内容,根据不同的请求进行不同的组合
    switch (arg){
       //实时天气,例:http://api.seniverse.com/v3/weather/now.json?key=your_api_key&locations=beijing&language=en&unit=c
       case WEATHER_CURRENT:
        strcat(WEB_PATH,WEB_PATH_CURRENT_1);
        strcat(WEB_PATH,reqlocations);
        strcat(WEB_PATH,WEB_PATH_CURRENT_2);
        strcat(WEB_PATH,REQUEST_ED);
        break;
        //生活指数,例:http://api.seniverse.com/v3/life/suggestion.json?key=SzOM2PDJp7crLA0Ug&locations=haikou&language=en
        case WEATHER_LIFE:
        strcat(WEB_PATH,WEB_PATH_LIFE_1);
        strcat(WEB_PATH,reqlocations);
        strcat(WEB_PATH,WEB_PATH_LIFE_2);
        strcat(WEB_PATH,REQUEST_ED);
        break;
        //天气预报,例:http://api.seniverse.com/v3/weather/daily.json?key=your_api_key&locations=beijing&language=zh-Hans&unit=c&start=0&days=5
        case WEATHER_FORECAST:
        strcat(WEB_PATH,WEB_PATH_FORECAST_1);
        strcat(WEB_PATH,reqlocations);
        strcat(WEB_PATH,WEB_PATH_FORECAST_2);
        strcat(WEB_PATH,REQUEST_ED);
        break;

        default:ESP_LOGI(TAG, "wrong");

    }


    int err = getaddrinfo(WEB_SERVER, WEB_PORT, &hints, &res);

    if(err != 0 || res == NULL) {
        ESP_LOGE(TAG, "DNS lookup failed err=%d res=%p", err, res);
        vTaskDelay(1000 / portTICK_PERIOD_MS);
        sendData(TAG,"httprequestfail");     //http初始化失败,告知pico

    }else {
        /* Code to print the resolved IP.

           Note: inet_ntoa is non-reentrant, look at ipadsdr_ntoa_r for "real" code */
        addr = &((struct sockaddr_in *)res->ai_addr)->sin_addr;
        ESP_LOGI(TAG, "DNS lookup succeeded. IP=%s", inet_ntoa(*addr));

        s = socket(res->ai_family, res->ai_socktype, 0);
        if(s < 0) {
            ESP_LOGE(TAG, "... Failed to allocate socket.");
            freeaddrinfo(res);
            vTaskDelay(1000 / portTICK_PERIOD_MS);
            sendData(TAG,"httprequestfail"); //http初始化失败,告知pico
        }else{
            ESP_LOGI(TAG, "... allocated socket");

            if(connect(s, res->ai_addr, res->ai_addrlen) != 0) {
                ESP_LOGE(TAG, "... socket connect failed errno=%d", errno);
                close(s);
                freeaddrinfo(res);
                vTaskDelay(4000 / portTICK_PERIOD_MS);
                sendData(TAG,"httprequestfail"); //http初始化失败,告知pico
            }else{
                ESP_LOGI(TAG, "... connected");
                freeaddrinfo(res);

                if (write(s, WEB_PATH, strlen(WEB_PATH)) < 0) {
                    ESP_LOGE(TAG, "... socket send failed");
                    close(s);
                    vTaskDelay(4000 / portTICK_PERIOD_MS);
                    sendData(TAG,"httprequestfail"); //http初始化失败,告知pico
                }else{
                    ESP_LOGI(TAG, "... socket send success");

                    struct timevals receiving_timeout;
                    receiving_timeout.tv_sec = 5;
                    receiving_timeout.tv_usec = 0;
                    if (setsockopt(s, SOL_SOCKET, SO_RCVTIMEO, &receiving_timeout,
                        sizeof(receiving_timeout)) < 0) {
                        ESP_LOGE(TAG, "... failed to set socket receiving timeout");
                        close(s);
                        vTaskDelay(4000 / portTICK_PERIOD_MS);
                        sendData(TAG,"httprequestfail"); //http初始化失败,告知pico
                    }else{
                        ESP_LOGI(TAG, "... set socket receiving timeout success");


                        /* Read HTTP response */
                        do {
                            bzero(recv_buf, sizeof(recv_buf));
                            r = read(s, recv_buf, sizeof(recv_buf)-1);
                            strcat(mid_buf,recv_buf);
                            for(int i = 0; i < r; i++) {
                                putchar(recv_buf[i]);
                            }
                        } while(r > 0);
                        // ESP_LOGI(TAG,"return=%s",mid_buf);
                        //json格式转化
                        cjson_to_struct_info(mid_buf,arg);


                        ESP_LOGI(TAG, "... done reading from socket. Last read return=%d errno=%d.", r, errno);
                        close(s);

                    }
                }
            }

        }

    }    }
void http_get_task(void){
    memset(send_data_quene,0,sizeof(send_data_quene));
    http_get(WEATHER_CURRENT); //天气实况
    vTaskDelay(1000 / portTICK_PERIOD_MS);  //适当延时
    http_get(WEATHER_FORECAST); //天气预报
    vTaskDelay(1000 / portTICK_PERIOD_MS);
    http_get(WEATHER_LIFE);     //生活指数
    vTaskDelay(1000 / portTICK_PERIOD_MS);
    ESP_LOGI(TAG,"send_data:%s",send_data_quene);
    sendData(TAG,send_data_quene);//整合发送}
实时天气,例:http://api.seniverse.com/v3/weather/now.json?key=your_api_key&locations=beijing&language=en&unit=c
生活指数,例:http://api.seniverse.com/v3/life/suggestion.json?key=SzOM2PDJp7crLA0Ug&locations=haikou&language=en
天气预报,例:http://api.seniverse.com/v3/weather/daily.json?key=your_api_key&locations=beijing&language=zh-Hans&unit=c&start=0&days=5
所以在函数在加入判断到底发送哪一个,相应的请求行要进行不同组合,在http_get()函数中做判断,具体内容在http.h中,如下。
#define WEB_SERVER "api.seniverse.com"#define WEB_PORT "80"#define reqUserKey "SzOM2PDJp7crLA0Ug"// #define reqlocations "Shenzhen"#define reqUnit "c"//天气实况#define WEATHER_CURRENT 'C' #define WEB_PATH_CURRENT_1 "/v3/weather/now.json?key=" reqUserKey "&locations="  #define WEB_PATH_CURRENT_2 "&language=en&unit=" reqUnit//生活指数#define WEATHER_LIFE 'L'#define WEB_PATH_LIFE_1 "/v3/life/suggestion.json?key=" reqUserKey "&locations="  #define WEB_PATH_LIFE_2 "&language=en"//天气预报#define WEATHER_FORECAST 'F'#define WEB_PATH_FORECAST_1 "/v3/weather/daily.json?key=" reqUserKey "&locations="  #define WEB_PATH_FORECAST_2 "&language=en&unit=" reqUnit "&start=0&days=5"//http请求尾static const char *REQUEST_ED = " HTTP/1.0
"
        "Host: "WEB_SERVER":"WEB_PORT"
"
        "User-Agent: esp-idf/1.0 esp32
"
        "
";//城市名char *reqlocations ;
/***********json格式解析************/void cjson_to_struct_info(char *text,char arg){
cJSON *root,*psub;
cJSON *arrayItem;
//截取有效json
char *index=strchr(text,'{');
strcpy(text,index);
root = cJSON_Parse(text);
if(root!=NULL)
{
/*******************天气实况**********/
if(arg == WEATHER_CURRENT){
psub = cJSON_GetObjectItem(root, "results");
arrayItem = cJSON_GetArrayItem(psub,0);
cJSON *locat = cJSON_GetObjectItem(arrayItem, "locations");
cJSON *now = cJSON_GetObjectItem(arrayItem, "now");
if((locat!=NULL)&&(now!=NULL))
{
psub=cJSON_GetObjectItem(locat,"name");
sprintf(weathe.cit,"%s",psub->valuestring);
ESP_LOGI(TAG,"city:%s",weathe.cit);
strcat(send_data_quene,weathe.cit); //拼接发送字符串
strcat(send_data_quene,"+"); //分割符,让pico识别
psub=cJSON_GetObjectItem(now,"text");
sprintf(weathe.weather_text,"%s",psub->valuestring);
ESP_LOGI(TAG,"weather:%s",weathe.weather_text);
strcat(send_data_quene,weathe.weather_text);
strcat(send_data_quene,"+");
psub=cJSON_GetObjectItem(now,"code");
sprintf(weathe.weather_code,"%s",psub->valuestring);
ESP_LOGI(TAG,"%s",weathe.weather_code);
strcat(send_data_quene,weathe.weather_code);
strcat(send_data_quene,"+");
psub=cJSON_GetObjectItem(now,"temperature");
sprintf(weathe.temperatur,"%s",psub->valuestring);
ESP_LOGI(TAG,"temperatur:%s",weathe.temperatur);
strcat(send_data_quene,weathe.temperatur);
strcat(send_data_quene,"+");
}else{
sendData(TAG,"httprequestfail"); //json格式有误。http请求失败
}
}
/*****************天气预报*************************/
if(arg == WEATHER_FORECAST){
psub = cJSON_GetObjectItem(root, "results");
arrayItem = cJSON_GetArrayItem(psub,0);
cJSON *locat = cJSON_GetObjectItem(arrayItem, "locations");
cJSON *daily = cJSON_GetObjectItem(arrayItem, "daily");
if((locat!=NULL)&&(daily!=NULL))
{
for(int i = 0;i<3;i++){
arrayItem = cJSON_GetArrayItem(daily,i);
psub = cJSON_GetObjectItem(arrayItem, "date");
sprintf(weathe.daily_weathe[i].date,"%s",psub->valuestring);
ESP_LOGI(TAG,"date:%s",weathe.daily_weathe[i].date);
strcat(send_data_quene,weathe.daily_weathe[i].date);
strcat(send_data_quene,"+");
psub = cJSON_GetObjectItem(arrayItem, "text_day");
sprintf(weathe.daily_weathe[i].text_day,"%s",psub->valuestring);
ESP_LOGI(TAG,"text_day:%s",weathe.daily_weathe[i].text_day);
strcat(send_data_quene,weathe.daily_weathe[i].text_day);
strcat(send_data_quene,"+");
psub = cJSON_GetObjectItem(arrayItem, "code_day");
sprintf(weathe.daily_weathe[i].code_day,"%s",psub->valuestring);
ESP_LOGI(TAG,"code_day:%s",weathe.daily_weathe[i].code_day);
strcat(send_data_quene,weathe.daily_weathe[i].code_day);
strcat(send_data_quene,"+");
psub = cJSON_GetObjectItem(arrayItem, "text_night");
sprintf(weathe.daily_weathe[i].text_night,"%s",psub->valuestring);
ESP_LOGI(TAG,"text_night:%s",weathe.daily_weathe[i].text_night);
strcat(send_data_quene,weathe.daily_weathe[i].text_night);
strcat(send_data_quene,"+");
psub = cJSON_GetObjectItem(arrayItem, "code_night");
sprintf(weathe.daily_weathe[i].code_night,"%s",psub->valuestring);
ESP_LOGI(TAG,"code_night:%s",weathe.daily_weathe[i].code_night);
strcat(send_data_quene,weathe.daily_weathe[i].code_night);
strcat(send_data_quene,"+");
psub = cJSON_GetObjectItem(arrayItem, "high");
sprintf(weathe.daily_weathe[i].high,"%s",psub->valuestring);
ESP_LOGI(TAG,"high:%s",weathe.daily_weathe[i].high);
strcat(send_data_quene,weathe.daily_weathe[i].high);
strcat(send_data_quene,"+");
psub = cJSON_GetObjectItem(arrayItem, "low");
sprintf(weathe.daily_weathe[i].low,"%s",psub->valuestring);
ESP_LOGI(TAG,"low:%s",weathe.daily_weathe[i].low);
strcat(send_data_quene,weathe.daily_weathe[i].low);
strcat(send_data_quene,"+");
psub = cJSON_GetObjectItem(arrayItem, "precip");
sprintf(weathe.daily_weathe[i].precip,"%s",psub->valuestring);
ESP_LOGI(TAG,"precip:%s",weathe.daily_weathe[i].precip);
strcat(send_data_quene,weathe.daily_weathe[i].precip);
strcat(send_data_quene,"+");
psub = cJSON_GetObjectItem(arrayItem, "humidity");
sprintf(weathe.daily_weathe[i].humidity,"%s",psub->valuestring);
ESP_LOGI(TAG,"humidity:%s",weathe.daily_weathe[i].humidity);
strcat(send_data_quene,weathe.daily_weathe[i].humidity);
strcat(send_data_quene,"+");
}
}
else{
sendData(TAG,"httprequestfail"); //json格式有误。http请求失败
}
}
/**************************生活指数****************************************/
if(arg == WEATHER_LIFE){
psub = cJSON_GetObjectItem(root, "results");
arrayItem = cJSON_GetArrayItem(psub,0);
cJSON *locat = cJSON_GetObjectItem(arrayItem, "locations");
cJSON *suggestion = cJSON_GetObjectItem(arrayItem, "suggestion");
if((locat!=NULL)&&(suggestion!=NULL))
{
cJSON *car_washing=cJSON_GetObjectItem(suggestion,"car_washing");
psub=cJSON_GetObjectItem(car_washing,"brief");
sprintf(weathe.car_washing,"%s",psub->valuestring);
ESP_LOGI(TAG,"car_washing:%s",weathe.car_washing);
strcat(send_data_quene,weathe.car_washing);
strcat(send_data_quene,"+");
cJSON *dressing=cJSON_GetObjectItem(suggestion,"dressing");
psub=cJSON_GetObjectItem(dressing,"brief");
sprintf(weathe.dressing,"%s",psub->valuestring);
ESP_LOGI(TAG,"dressing:%s",weathe.dressing);
strcat(send_data_quene,weathe.dressing);
strcat(send_data_quene,"+");
cJSON *flu=cJSON_GetObjectItem(suggestion,"flu");
psub=cJSON_GetObjectItem(flu,"brief");
sprintf(weathe.flu,"%s",psub->valuestring);
ESP_LOGI(TAG,"flu:%s",weathe.flu);
strcat(send_data_quene,weathe.flu);
strcat(send_data_quene,"+");
cJSON *sport=cJSON_GetObjectItem(suggestion,"sport");
psub=cJSON_GetObjectItem(sport,"brief");
sprintf(weathe.sport,"%s",psub->valuestring);
ESP_LOGI(TAG,"sport:%s",weathe.sport);
strcat(send_data_quene,weathe.sport);
strcat(send_data_quene,"+");
cJSON *travel=cJSON_GetObjectItem(suggestion,"travel");
psub=cJSON_GetObjectItem(travel,"brief");
if (psub->valuestring[0] == '�'){
sprintf(weathe.travel,"%s","No Result");
}else{
sprintf(weathe.travel,"%s",psub->valuestring);
}
ESP_LOGI(TAG,"travel:%s",weathe.travel);
strcat(send_data_quene,weathe.travel);
strcat(send_data_quene,"+");
cJSON *uv=cJSON_GetObjectItem(suggestion,"uv");
psub=cJSON_GetObjectItem(uv,"brief");
sprintf(weathe.uv,"%s",psub->valuestring);
ESP_LOGI(TAG,"uv:%s",weathe.uv);
strcat(send_data_quene,weathe.uv);
// strcat(send_data_quene,"+");
}else{
sendData(TAG,"httprequestfail"); //json格式有误。http请求失败
}
}
}
cJSON_delete(root);}
    async def initialise_wifi(self):#          初始化界面
        self.drawing.draw_opening()
        await asyncio.sleep_ms(2000)
       #        "+"和"-"用于让esp32识别是wifi名还是密码
        self.send_quene = "+" + wifi_name
        self.uart.write(self.send_quene)
        await asyncio.sleep_ms(1000)
        self.send_quene = "-" + wifi_passwd
        self.uart.write(self.send_quene)

        self.picture_index = 0
        self.drawing.draw_sending()  #发送中
        self.err = True
#         检测wifi是否连接成功        while self.err == True:
            await self.uart_task()
void rx_task(void *arg){
               ........................
            if (data[0] == '+'){
                //收到“+”开头,判断为wifi名
                Wifi_ssid = &data[1];    //截取
                strcpy (ssid,Wifi_ssid); //转存

            }
            else if(data[0] == '-'){
                //收到“-”开头,判断为wifi密码
                Wifi_password = &data[1];  //截取
                strcpy (passwd,Wifi_password);  //转存
                ESP_LOGI(RX_TASK_TAG, "ssid %s password: '%s'", ssid, passwd);

                wifi_init_sta(ssid,passwd);  //wifi初始化
            }else{

                ...............................

            }


    }
def data_deal(self):
        if self.text.find(b'+') != -1:
            decode_receiveStr = self.text.decode()   #去编码,转化为文本
            self.receive_items = decode_receiveStr.split('+')
            print(self.receive_items)
            http_get_data.city_name_text = self.receive_items[0]
            http_get_data.weather_current_text = self.receive_items[1]
            http_get_data.weather_current_code = self.receive_items[2]
            http_get_data.current_temperature = self.receive_items[3]
            http_get_data.date0 = self.receive_items[4]
            http_get_data.date0_day_text = self.receive_items[5]
            http_get_data.date0_day_code = self.receive_items[6]
            http_get_data.date0_night_text = self.receive_items[7]
            http_get_data.date0_night_code = self.receive_items[8]
           ........
  async def uart_task(self):
         ......
        #         发送任务
        if self.send_flag == True:
            self.uart.write(self.send_quene)
            self.send_flag = False
 void rx_task(void *arg){

            ...................................
     if (rxBytes > 0) {
            data[rxBytes] = 0;
            ESP_LOGI(RX_TASK_TAG, "Read %d bytes: '%s'", rxBytes, data);
            ESP_LOG_BUFFER_HEXDUMP(RX_TASK_TAG, data, rxBytes, ESP_LOG_INFO);
            if (data[0] == '+'){
                //收到“+”开头,判断为wifi名
                Wifi_ssid = &data[1];    //截取
                strcpy (ssid,Wifi_ssid); //转存

            }
            else if(data[0] == '-'){
                //收到“-”开头,判断为wifi密码
                Wifi_password = &data[1];  //截取
                strcpy (passwd,Wifi_password);  //转存
                ESP_LOGI(RX_TASK_TAG, "ssid %s password: '%s'", ssid, passwd);

                wifi_init_sta(ssid,passwd);  //wifi初始化
            }else{
                //一般字符串,城市名
                reqlocations = data;
                ESP_LOGI(RX_TASK_TAG, "Re: '%s'", reqlocations);
                http_get_task();   //接受到立即发送请求


            }

        ......................


    }
    async def uart_task(self):
        self.receive_flag = self.uart.any()
         ...........
            #             wifi连接失败
            if receiveStr == b'Connectfail':
                self.drawing.draw_wificonnectfail()
                await asyncio.sleep_ms(1500)
                self.err = True
#             http请求失败
            elif receiveStr == b'httprequestfail':
                self.drawing.draw_httprequestfail()
                self.err = True
                await asyncio.sleep_ms(1500)

             ..........................
class weather:
picture_big = "/weather_picture_big/Unknown.jpg"
picture_small = "/weather_picture_small/Unknown.jpg"
def weather0(self):
weather.picture_big = "/weather_picture_big/Sunny.jpg"
weather.picture_small = "/weather_picture_small/Sunny.jpg"
def weather1(self):
weather.picture_big = "/weather_picture_big/Clear.jpg"
weather.picture_small = "/weather_picture_small/Clear.jpg"
................
def Default(self):
weather.picture_big = "/weather_picture_big/Unknown.jpg"
weather.picture_small = "/weather_picture_small/Unknown.jpg"
def getweather(self, weather):
weather_name = "weather" + str(weather)
fun = getattr(self, weather_name, self.Default)
return fun()class draw:
.........................
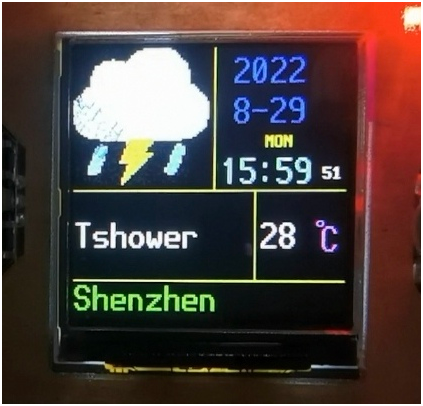
def draw_real_time_weather_picture(self,city_name,weather_current_code,weather_current_text,current_temperature):
self.display.init()
self.code.getweather(weather_current_code) #天气代码判断
................
self.display.jpg(self.code.picture_big ,0 , 0, st7789.FAST)
    def draw_real_time_weather_picture(self,city_name,weather_current_code,weather_current_text,current_temperature):

        ..................

        if weather_current_text.find('Thunder') != -1:
            weather_current_text = weather_current_text.replace('Thunder','T')

        if weather_current_text.find(' ') != -1:
            item = weather_current_text.split(' ',1)
            self.display.text(font2,item[0],0,130)
            self.display.text(font2,item[1],0,170)
        else:
            self.display.text(font2,weather_current_text,0,150)

          ...........................
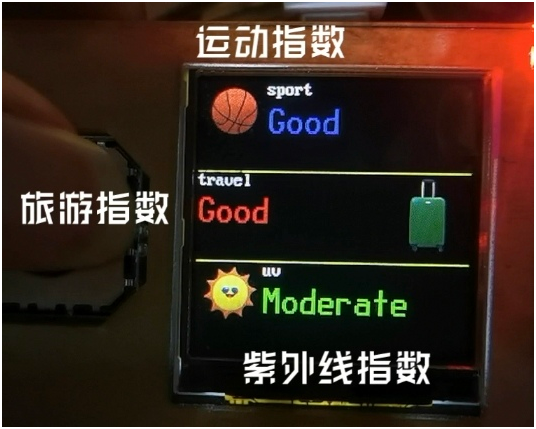
    def draw_index_of_living(self,index1,index2,index3,picture_index):

           ............................#         由于6向指数很难在同一幅画面显示,所以分开显示
        if picture_index == 2:
            self.display.text(font3,"car_washing",60,0)          #洗车指数
            self.display.jpg("/index of living/car_washing.jpg" ,0 , 0, st7789.FAST)
            self.display.text(font2,index1,60,20,st7789.BLUE)

            self.display.text(font3,"dressing",0,81)                    #穿衣指数
            self.display.jpg("/index of living/dressing.jpg" ,180 , 81, st7789.FAST)
            self.display.text(font2,index2,0,100,st7789.RED)

            self.display.text(font3,"flu",60,161)                #流感指数
            self.display.jpg("/index of living/flu.jpg" ,0 , 161, st7789.FAST)
            self.display.text(font2,index3,60,180,st7789.GREEN)

        if picture_index == 3:
            self.display.text(font3,"sport",60,0)            #运动指数
            self.display.jpg("/index of living/sport.jpg" ,0 , 0, st7789.FAST)
            self.display.text(font2,index1,60,20,st7789.BLUE)

            self.display.text(font3,"travel",0,81)            #旅游指数
            self.display.jpg("/index of living/travel.jpg" ,180 , 81, st7789.FAST)
            self.display.text(font2,index2,0,100,st7789.RED)

            self.display.text(font3,"uv",60,161)             #紫外线指数
            self.display.jpg("/index of living/uv.jpg" ,0 , 161, st7789.FAST)
            self.display.text(font2,index3,60,180,st7789.GREEN)
    def draw_weather_forcast(self,date0,date0_day_text,date0_day_code,date0_high_temperature,date0_low_temperature,date0_precip,date0_humidity,
                             date1,date1_day_text,date1_day_code,date1_high_temperature,date1_low_temperature,date1_precip,date1_humidity,
                             date2,date2_day_text,date2_day_code,date2_high_temperature,date2_low_temperature,date2_precip,date2_humidity):

          .......................


        self.display.text(font3,"H"+date0_high_temperature,5,120,st7789.RED)       #最高气温
        self.display.text(font3,"L"+date0_low_temperature,5,140,st7789.BLUE)       #最低气温
        self.display.text(font2,"C",43,125)
        self.display.text(font1,"o",40,120)


            .........................
   def draw_weather_forcast(self,date0,date0_day_text,date0_day_code,date0_high_temperature,date0_low_temperature,date0_precip,date0_humidity,
                             date1,date1_day_text,date1_day_code,date1_high_temperature,date1_low_temperature,date1_precip,date1_humidity,
                             date2,date2_day_text,date2_day_code,date2_high_temperature,date2_low_temperature,date2_precip,date2_humidity):

          ..........................

       self.display.text(font3,"POP:",0,160,st7789.MAGENTA)       #降雨概率POP
        num_date0_precip = float(date0_precip)
        length = int(num_date0_precip * 70)
        self.display.fill_rect(5,183,length,5,st7789.MAGENTA)       #颜色条显示,越长百分比越大
        self.display.fill_rect(3,182,5,7,st7789.WHITE)
        num_date0_precip = num_date0_precip * 100
        num_date0_precip= int(num_date0_precip)
        self.display.text(font3,str(num_date0_precip)+"%",50,160,st7789.MAGENTA)

        self.display.text(font3,"HR:",0,190,st7789.CYAN)          #相对湿度HR
        num_date0_humidity= int(date0_humidity)
        length = int(num_date0_humidity * 70 /100)
        self.display.fill_rect(5,213,length,5,st7789.CYAN)
        self.display.fill_rect(3,212,5,7,st7789.WHITE)
        self.display.text(font3,str(num_date0_humidity)+"%",50,190,st7789.CYAN)

        ....................................
    def draw_times(self):
        if self.rtc.datetime() != self.last :
            time_index = self.rtc.datetime()
            #             只在实时天气界面显示时间
            if self.picture_index == 1 :
                self.drawing.draw_time(str(time_index[0]),str(time_index[1]),str(time_index[2]),str(time_index[3]),str(time_index[4]),str(time_index[5]),str(time_index[6]))
            self.last = time_index
        gc.collect()
    async def process(self):

        self.hardware_init()
        await self.initialise_wifi()  #初始化界面

        self.last_hour = self.rtc.datetime()[4]
        self.last = self.rtc.datetime()
        while True:
            self.dir_select()     #遥感检测
            self.regular_update() #定时更新
            self.draw_times()     #更新时间
            self.city_choose()    #修改城市名
            await self.uart_task()  #串口任务
    def dir_select(self):

        xValue = self.xAxis.read_u16()
        yValue = self.yAxis.read_u16()

        if xValue <1000:
            self.picture_index -= 1
            if self.picture_index < 1 :
                self.picture_index = 4
            self.draw_picture()   #遥感有动作时才更新画面
        elif xValue >40000:
            self.picture_index += 1
            if self.picture_index > 4 :
                self.picture_index = 1
            self.draw_picture()

        gc.collect()
    def refresh_callback(self, p):
        print("k2 pressed")
        self.send_flag = True
    def keyboard_callback(self, p):
        print("kkk pressed")
        self.keyboard_cw = True
class locations:
    caps = 1       #大小写开关
    number = 0     #数字开关

    def locations1_1(self):
       return "123"    #切换为数字


    def locations2_1(self):
        if locations.number == 1:
            return "1  "
        elif locations.caps == 1:
            return "abc"
        else:
            return "ABC"

    def locations3_1(self):

       if locations.number == 1:
            return "2  "
       elif locations.caps == 1:
            return "def"
       else:
            return "DEF"

    def locations4_1(self):

        if locations.number == 1:
            return "3  "
        elif locations.caps == 1:
            return "ghi"
        else:
            return "GHI"

    def locations1_2(self):
        return "A/a"         #切换大小写


    def locations2_2(self):
        if locations.number == 1:
            return "4  "
        elif locations.caps == 1:
            return "jkl"
        else:
            return "JKL"

    def locations3_2(self):
        if locations.number == 1:
            return "5  "
        elif locations.caps == 1:
            return "mno"
        else:
            return "MNO"

    def locations4_2(self):
        if locations.number == 1:
            return "6   "
        elif locations.caps == 1:
            return "pqrs"
        else:
            return "PQRS"

    def locations1_3(self):
        return "DEL"     #删除字符


    def locations2_3(self):
       if locations.number == 1:
            return "7  "
       elif locations.caps == 1:
            return "tuv"
       else:
            return "TUV"

    def locations3_3(self):
        if locations.number == 1:
            return "8   "
        elif locations.caps == 1:
            return "wxyz"
        else:
            return "WXYZ"

    def locations4_3(self):
        if locations.number == 1:
            return "9  "
        else:
            return '>_<'   #英文字母不需要这一位
    def locations1_4(self):
        return "ENT"    #发送字符


    def locations2_4(self):
        return '>_<'
    def locations3_4(self):
        if locations.number == 1:
            return "0  "
        else:
            return '>_<' #英文字母不需要这一位

    def locations4_4(self):
        return '>_<'

    def Default(self):
        print("wrong")

    def getlocations(self, locationsx,locationsy):
        locations_name = "locations" + str(locationsx)+"_"+str(locationsy)
        fun = getattr(self, locations_name, self.Default)
        return fun()
    def draw_keyboard(self):
        a = locations()
        self.display.fill_rect(0,101,34,139,st7789.BLACK)
        self.display.fill_rect(36,206,63,33,st7789.BLACK)
        self.display.fill_rect(176,206,63,33,st7789.BLACK)
        self.display.vline(35,100,140,st7789.YELLOW)
        self.display.vline(105,100,140,st7789.YELLOW)
        self.display.vline(175,100,240,st7789.YELLOW)
        self.display.hline(0,100,240,st7789.YELLOW)
        self.display.hline(0,135,240,st7789.YELLOW)
        self.display.hline(0,170,240,st7789.YELLOW)
        self.display.hline(0,205,240,st7789.YELLOW)

        self.display.text(font2,a.getlocations(2,1),36,101 )
        self.display.text(font2,a.getlocations(3,1),106,101 )
        self.display.text(font2,a.getlocations(4,1),176,101 )

        self.display.text(font2,a.getlocations(2,2),36,136 )
        self.display.text(font2,a.getlocations(3,2),106,136 )
        self.display.text(font2,a.getlocations(4,2),176,136 )

        self.display.text(font2,a.getlocations(2,3),36,171 )
        self.display.text(font2,a.getlocations(3,3),106,171 )
        self.display.text(font2,a.getlocations(4,3),176,171 )

        self.display.text(font2,a.getlocations(3,4),106,206 )

        self.display.text(font3,a.getlocations(1,1),0,101 )
        self.display.text(font3,a.getlocations(1,2),0,136 )
        self.display.text(font3,a.getlocations(1,3),0,171 )
        self.display.text(font3,a.getlocations(1,4),0,206 )
        #     选中按键字体变成黄色表示高亮
    def draw_highlight(self,x,y):
        a = locations()
        locat_x = 36 + 70 * (x-2)
        locat_y = 101 + 35 * (y-1)#         功能键字体大小偏小需另外处理
        if x == 1:
            self.display.text(font3,a.getlocations(x,y),0,locat_y,st7789.YELLOW)
        else:
            self.display.text(font2,a.getlocations(x,y),locat_x,locat_y,st7789.YELLOW)
    def keyboard(self):#         画出键盘
        self.drawing_keyboard()
        self.drawing.draw_quene(self.send_quene)#         修改按键AB的回调函数
        self.k1 = button(game_kit.key_a, self.k1_callback)
        self.k2 = button(game_kit.key_b, self.k2_callback)#         保持键盘画面,在确认发送后退出画面
        while self.keyboard_cw == True:
            self.backup = False
            xValue = self.xAxis.read_u16()
            yValue = self.yAxis.read_u16()
            sleep(0.2)
            if xValue <1000:
                self.locat_x -= 1
                if self.locat_x < 1:
                    self.locat_x = 1
                self.drawing_keyboard()  #每次移动摇杆后更新画面
            elif xValue >40000:
                self.locat_x += 1
                if self.locat_x > 4:
                    self.locat_x = 4
                self.drawing_keyboard()
            if yValue <1000:
                self.locat_y -= 1
                if self.locat_y < 1:
                    self.locat_y = 1
                self.drawing_keyboard()
            elif yValue >40000:
                self.locat_y += 1
                if self.locat_y > 4:
                    self.locat_y = 4
                self.drawing_keyboard()
            #             选中一格
            if self.chosen :
                self.chosen = False
                a= locations()
                s_list=list(self.send_quene )#将字符串转换为列表
                #                 选中发送键
                if a.getlocations(self.locat_x,self.locat_y) == "ENT":
                    self.keyboard_cw = False   #关闭键盘退出循环
                    #                     选中删除键
                elif a.getlocations(self.locat_x,self.locat_y) == "DEL" :#                     判断是否已经全部删除完了
                    if len(s_list)!= 0 :
                        s_list.pop(-1)#pop掉列表最后一个值,返回被pop掉的值
                        self.send_quene = ''.join(s_list)#将pop之后的列表通过join()函数转换为字符串
                        self.drawing.draw_quene(self.send_quene) #更新已写入内容
                        #                         选中有效区域
                elif a.getlocations(self.locat_x,self.locat_y) != ">_<" :
                    if a.getlocations(self.locat_x,self.locat_y) == "123":   #选中切换数字
                        locations.number = 1
                        self.drawing_keyboard()
                    elif a.getlocations(self.locat_x,self.locat_y) == "A/a": #选中切换大小写
                        locations.number = 0
                        locations.caps = 1-locations.caps
                        self.drawing_keyboard()
                    else:
                        self.branch_choose(self.locat_x,self.locat_y) #选中字符串
/weather_main.py    def branch_choose(self,x,y):
        index = 1
        a = locations()
        index_max = len(a.getlocations(self.locat_x,self.locat_y)) #按键内容占格数
        self.drawing_branch(index)
        #         是否按下回退键,若按下则回到键位选择
        while self.backup == False  :
            sleep(0.2)
            yValue = self.yAxis.read_u16()
            if yValue <1000:
                index -= 1
                if index < 1:
                    index = 1
                self.drawing_branch(index)
            elif yValue >40000:
                index += 1
                if index > index_max:
                    index = index_max
                self.drawing_branch(index)
                #            选中字符
            if self.chosen :
                self.chosen = False
                self.send_quene = ''.join([self.send_quene,a.getlocations(self.locat_x,self.locat_y)[index-1]]) #将字符加入发送队列
                self.backup =True  #退出分支

            self.drawing.draw_quene(self.send_quene) #更新写入内容
        self.backup = False
        self.drawing_keyboard()/draw.py    def draw_branch(self,index,str):

       self.display.fill_rect(0,101,34,33,st7789.BLACK)
       self.display.fill_rect(0,136,34,33,st7789.BLACK)
       self.display.fill_rect(0,171,34,33,st7789.BLACK)
       self.display.fill_rect(0,206,34,33,st7789.BLACK)
       locat_y = 101 + 35*(index -1)
       for i in range(0,len(str)):
           self.display.text(font2,str[i],0,101 + 35 * i)
       self.display.text(font2,str[index-1],0,locat_y,st7789.YELLOW)
    def city_choose(self):
        if self.keyboard_cw == True:
            self.drawing.clear()  #清屏
            self.drawing.draw_tip("city_name:")
            self.keyboard()
            self.picture_index = 0
            self.drawing.draw_sending()  #发送中画面
            #             将按键回调函数修改回一般模式下的情况
            self.k1 = button(game_kit.key_a, self.keyboard_callback)
            self.k2 = button(game_kit.key_b, self.refresh_callback)
            self.send_flag = True  #可以发送
            gc.collect()
            self.last = self.rtc.datetime()  #还原现场,保持时间更新
- 加入中文显示。有关这方面的知识我还不太了解,如果能有中文显示界面将可以进一步优化。
- 加入WiFi扫描与连接。既然有了键盘理论上就能通过操作游戏机来联网,这样使用起来将更加灵活。
- 利用Esp 32的 NVM储存WiFi的相关信息,这样在每次断电后再恢复供电时能自动连接WiFi?
相关推荐
开源3D打印国际象棋钟:支持增量、回合加时、亮度与电量查看
2025-12-29
96
ITB8888通博slkor肖特基二极管SS36B
2025-10-16
87
ITB8888通博Slkor肖特基二极管SS36F
2025-10-17
139
ITB8888通博Slkor肖特基二极管SD103AW
2025-10-17
133


 粤公网安备44030002007346号